Homemade California Crunch Roll Sushi
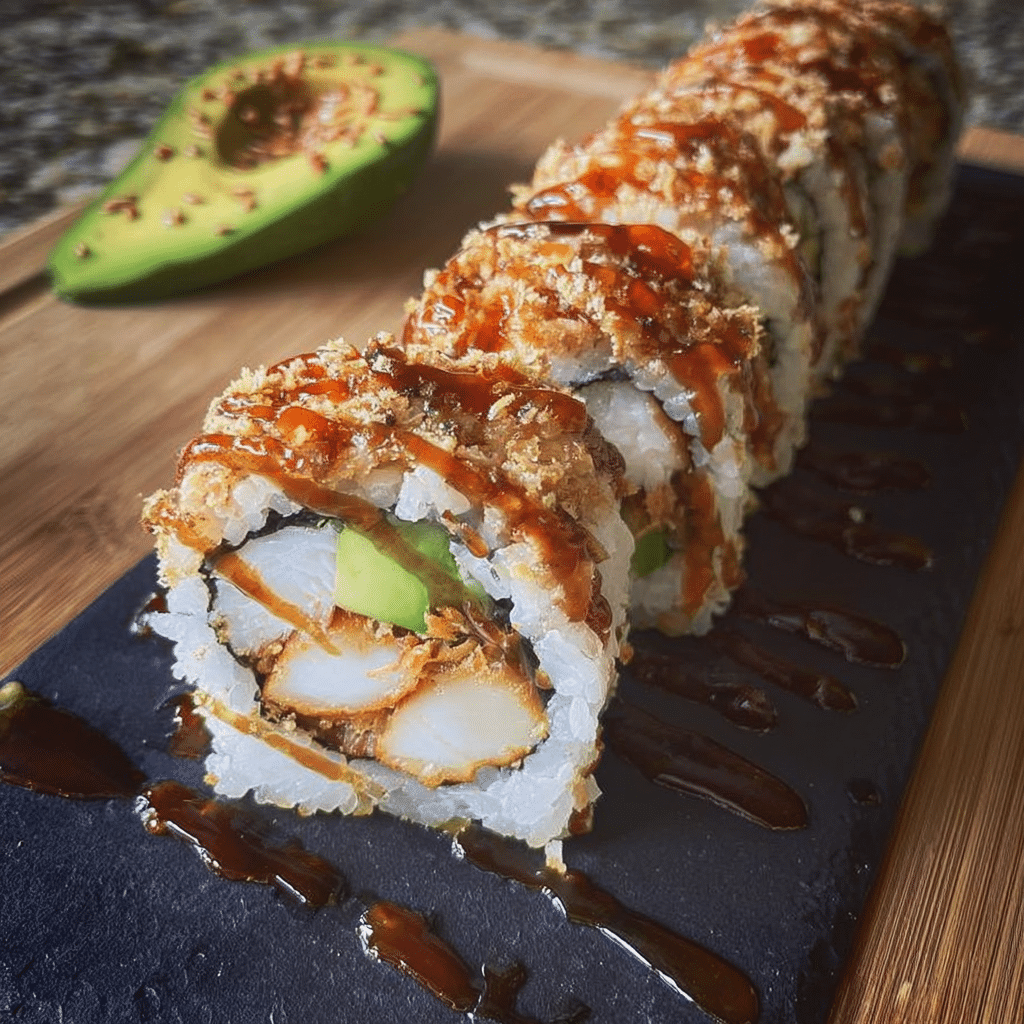
If you’re craving sushi but want to enjoy the fun and freshness of making it yourself, this Homemade California Crunch Roll Sushi recipe is the perfect choice. Combining creamy avocado, sweet crab, crunchy tempura flakes, and flavorful sushi rice wrapped in nori sheets, this roll offers a delightful balance of textures and flavors that will impress both your taste buds and guests. Making Homemade California Crunch Roll Sushi at home is easier than you think and a fantastic way to bring restaurant-quality sushi right into your kitchen.
Why You’ll Love This Recipe
- Fresh, wholesome ingredients: Each component adds nutrition and taste without any preservatives or artificial flavors.
- Crunchy texture boost: The crispy tempura flakes give the roll an irresistible crunch in every bite.
- Customizable and fun: You can tweak ingredients to suit your preferences or dietary needs.
- Great for gatherings: Sushi rolls are perfect for sharing and impressing friends with your culinary skills.
- Hands-on experience: Making sushi yourself adds a hands-on, creative cooking adventure that’s deeply satisfying.
Ingredients You’ll Need
The ingredients in this Homemade California Crunch Roll Sushi recipe are simple but essential for achieving that perfect balance of flavor, freshness, and crunch. Each ingredient plays a unique role, whether it’s the creamy avocado, tender crab, or the perfectly seasoned sushi rice.
- Sushi rice: Short-grain rice seasoned with rice vinegar to provide the sticky, slightly tangy base.
- Nori sheets: Thin seaweed sheets used as the outer wrap to hold everything together.
- Imitation crab meat: Also known as surimi, it’s sweet and tender, perfect for this roll.
- Avocado: Adds creamy richness that balances the crunchiness beautifully.
- Cucumber: Crisp and refreshing, it contributes lightness and texture.
- Tempura flakes: These crispy bits create the signature crunch that defines this roll.
- Mayonnaise-based sauce: A mix of mayo and sriracha or spicy mayo adds a creamy, spicy kick.
- Soy sauce and pickled ginger: Classic accompaniments for dipping and palate cleansing.
Variations for Homemade California Crunch Roll Sushi
This recipe is incredibly flexible, so feel free to experiment with flavors and textures based on what you love, your dietary requirements, or what’s in your fridge. The possibilities are endless and enjoyable!
- Vegan twist: Use mango or tofu in place of crab to keep it plant-based and vibrant.
- Spicy kick: Add jalapenos or mix wasabi into your mayo sauce for an extra fiery flavor.
- Seafood upgrade: Substitute imitation crab with real crab, shrimp tempura, or smoked salmon for a richer taste.
- Gluten-free version: Use gluten-free soy sauce and carefully check tempura flakes to keep things safe.
- Extra crunch: Incorporate crushed nuts like toasted sesame seeds or even crispy onions for an unconventional crunch.

How to Make Homemade California Crunch Roll Sushi
Step 1: Prepare the Sushi Rice
Start by rinsing 2 cups of sushi rice under cold water until the water runs clear, removing excess starch. Cook it according to your rice cooker or stovetop instructions. Once cooked, transfer the rice to a large bowl and gently fold in a mixture of 1/3 cup rice vinegar, 2 tablespoons sugar, and 1 teaspoon salt while the rice is still warm. Let it cool to room temperature for perfect stickiness and tang.
Step 2: Prep the Fillings
Slice your avocado into thin strips and julienne the cucumber. Tear or cut the imitation crab meat into manageable pieces. Have your tempura flakes and spicy mayo sauce ready to go for filling and topping the rolls.
Step 3: Spread the Rice on Nori
Place one nori sheet shiny side down on a bamboo sushi rolling mat covered lightly with plastic wrap. With wet hands, spread an even layer of sushi rice over the nori, leaving a 1-inch border at the top for sealing. Press gently but firmly to ensure it sticks well.
Step 4: Add Fillings and Roll
Flip the rice-covered nori so the rice side is down on the mat. Place avocado, cucumber, and crab meat in a line along the edge closest to you. Carefully roll using the mat, applying gentle pressure to keep it tight. Seal the edge with a dab of water.
Step 5: Add Tempura Crunch and Sauce
Sprinkle tempura flakes generously along the top of the roll, then drizzle spicy mayo to taste. For an extra crunch, gently press tempura flakes onto the outside before slicing.
Step 6: Slice and Serve
Using a sharp, wet knife, slice the roll into 6 to 8 pieces with a gentle sawing motion. Arrange your Homemade California Crunch Roll Sushi on a platter and serve with soy sauce, pickled ginger, and wasabi.
Pro Tips for Making Homemade California Crunch Roll Sushi
- Perfect rice texture: Rinsing rice multiple times before cooking is key for the best sushi rice stickiness and flavor.
- Keep hands moist: Wet your hands before handling rice to prevent sticking and ensure smooth spreading.
- Sharp knife is essential: Clean your knife with a damp cloth between cuts to get flawless sushi slices.
- Use fresh ingredients: Fresh avocado, cucumber, and crab make all the difference in taste and texture.
- Don’t overfill: Overloading fillings makes rolling difficult and the sushi prone to falling apart.
How to Serve Homemade California Crunch Roll Sushi
Garnishes
Top the rolls with extra tempura flakes for crunch, sprinkle with toasted sesame seeds for nuttiness, or add thin slices of green onion for a pop of color and mild bite.
Side Dishes
Serve with soy sauce for dipping, tangy pickled ginger to cleanse the palate, and a dab of wasabi for heat. Add a simple seaweed salad or edamame for a complete, refreshing Japanese-inspired meal.
Creative Ways to Present
Arrange the sushi creatively on a wooden sushi board or slate platter. Use small bowls of sauces, fresh herbs, and edible flowers to create a visually stunning spread perfect for entertaining or family dinners.
Make Ahead and Storage
Storing Leftovers
Place leftover sushi rolls in an airtight container lined with paper towels to absorb moisture, and refrigerate for up to 24 hours. Keep in mind that texture, especially the crunch, may soften with time.
Freezing
Freezing is not recommended for Homemade California Crunch Roll Sushi since the rice and fillings lose their texture and freshness after thawing.
Reheating
It’s best to enjoy this sushi fresh, but if necessary, let refrigerated rolls come to room temperature for 15-20 minutes before eating. Avoid microwaving to preserve texture and flavor.
FAQs
Can I use real crab instead of imitation crab?
Absolutely! Real crab meat will provide a richer flavor and luxurious texture, but imitation crab works well for budget-friendly and accessible sushi.
What can I use instead of tempura flakes?
If you don’t have tempura flakes, try crushed crispy fried onions, panko breadcrumbs fried until golden, or toasted nuts for a similar crunchy element.
Is there a vegetarian option for this sushi?
Yes! Swap crab for ingredients like marinated tofu, mango strips, or grilled vegetables and keep all other components the same for a tasty vegetarian roll.
How do I make sushi rice sticky?
Rinse your rice thoroughly to remove excess starch, cook it properly with the right water ratio, and mix in vinegar seasoning while the rice is still warm for optimal stickiness and flavor.
Can I prepare this recipe without a bamboo mat?
While a bamboo sushi rolling mat makes rolling easier and tighter, you can use a clean kitchen towel or your hands to gently shape the roll if needed.
Final Thoughts
Making Homemade California Crunch Roll Sushi at home is such a rewarding and delicious experience. It’s a wonderful way to enjoy fresh, vibrant flavors with friends and family while mastering a fun cooking skill. With its perfect balance of creamy avocado, sweet crab, and irresistible crunch, you’ll find yourself coming back to this recipe again and again. So roll up your sleeves, bring out the bamboo mat, and dive into the joy of sushi making!
Related Posts
- Cowboy Butter Steak & Broccoli Linguine
- Turkish Chicken with Creamy White Sauce
- Jalapeño Cream Cheese Chicken Taquitos with Buffalo Sauce
Homemade California Crunch Roll Sushi

This Homemade California Crunch Roll Sushi recipe combines creamy avocado, sweet imitation crab, crunchy tempura flakes, and perfectly seasoned sushi rice wrapped in nori sheets. It delivers a delightful blend of fresh flavors and textures, making it an easy and rewarding dish to prepare at home. Perfect for sushi lovers seeking a hands-on cooking experience, this recipe is customizable to suit various dietary preferences and is great for sharing with family and friends.
- Prep Time: 20 minutes
- Cook Time: 20 minutes
- Total Time: 40 minutes
- Yield: 4 rolls (6 to 8 pieces per roll) 1x
- Category: Appetizers
- Method: No-Bake
- Cuisine: Japanese
- Diet: Gluten Free (with gluten-free soy sauce and careful tempura flakes selection)
Ingredients
Sushi Rice
- 2 cups short-grain sushi rice
- 1/3 cup rice vinegar
- 2 tablespoons sugar
- 1 teaspoon salt
Roll Components
- 4–5 nori sheets (thin seaweed sheets)
- 8 oz imitation crab meat (surimi), torn or cut into pieces
- 1 ripe avocado, sliced into thin strips
- 1/2 cucumber, julienned
- 1/2 cup tempura flakes (crispy bits)
Sauce & Accompaniments
- Mayonnaise-based spicy sauce (mayo mixed with sriracha or spicy mayo)
- Soy sauce, for dipping
- Pickled ginger, for palate cleansing
- Wasabi, optional for heat
Instructions
- Prepare the Sushi Rice: Rinse 2 cups of sushi rice under cold water until the water runs clear to remove excess starch. Cook the rice according to your rice cooker or stovetop instructions. While still warm, gently fold in a mixture of 1/3 cup rice vinegar, 2 tablespoons sugar, and 1 teaspoon salt. Let the rice cool to room temperature to develop the perfect sticky and tangy base.
- Prep the Fillings: Slice the avocado into thin strips and julienne the cucumber. Tear or cut the imitation crab meat into manageable pieces. Have your tempura flakes and spicy mayo sauce ready for assembling.
- Spread the Rice on Nori: Place one nori sheet shiny side down on a bamboo sushi rolling mat lightly covered with plastic wrap. With wet hands, spread an even layer of sushi rice over the nori, leaving a 1-inch border at the top. Press gently but firmly to ensure the rice sticks well.
- Add Fillings and Roll: Flip the rice-covered nori so the rice side is down on the mat. Arrange avocado, cucumber, and crab meat in a line along the edge closest to you. Using the mat, carefully roll the sushi applying gentle pressure to keep it tight. Seal the edge with a dab of water.
- Add Tempura Crunch and Sauce: Sprinkle tempura flakes generously along the top of the roll. Drizzle spicy mayo sauce over the top to taste. For an extra crunchy texture, gently press some tempura flakes onto the outside before slicing.
- Slice and Serve: Using a sharp, wet knife, slice the roll into 6 to 8 pieces using a gentle sawing motion. Arrange the California Crunch Roll Sushi on a platter and serve with soy sauce, pickled ginger, and wasabi.
Notes
- Rinse sushi rice multiple times before cooking to achieve the best texture and stickiness.
- Keep your hands moist while handling rice to prevent sticking and ensure even spreading.
- Use a sharp knife and clean it with a damp cloth between cuts for clean sushi slices.
- Always use fresh ingredients like avocado, cucumber, and crab for optimal texture and flavor.
- Do not overfill the sushi rolls to avoid difficulty rolling and sushi falling apart.
Nutrition
- Serving Size: 1 roll (6-8 pieces)
- Calories: 300
- Sugar: 4g
- Sodium: 450mg
- Fat: 10g
- Saturated Fat: 2g
- Unsaturated Fat: 6g
- Trans Fat: 0g
- Carbohydrates: 40g
- Fiber: 4g
- Protein: 8g
- Cholesterol: 15mg
Keywords: California Roll, Sushi, Homemade Sushi, Crunch Roll, Avocado Sushi, Imitation Crab Sushi, Tempura Flakes, Spicy Mayo, Gluten Free Sushi