Why No-Bake Oreo Dirt Cake Will Wow You
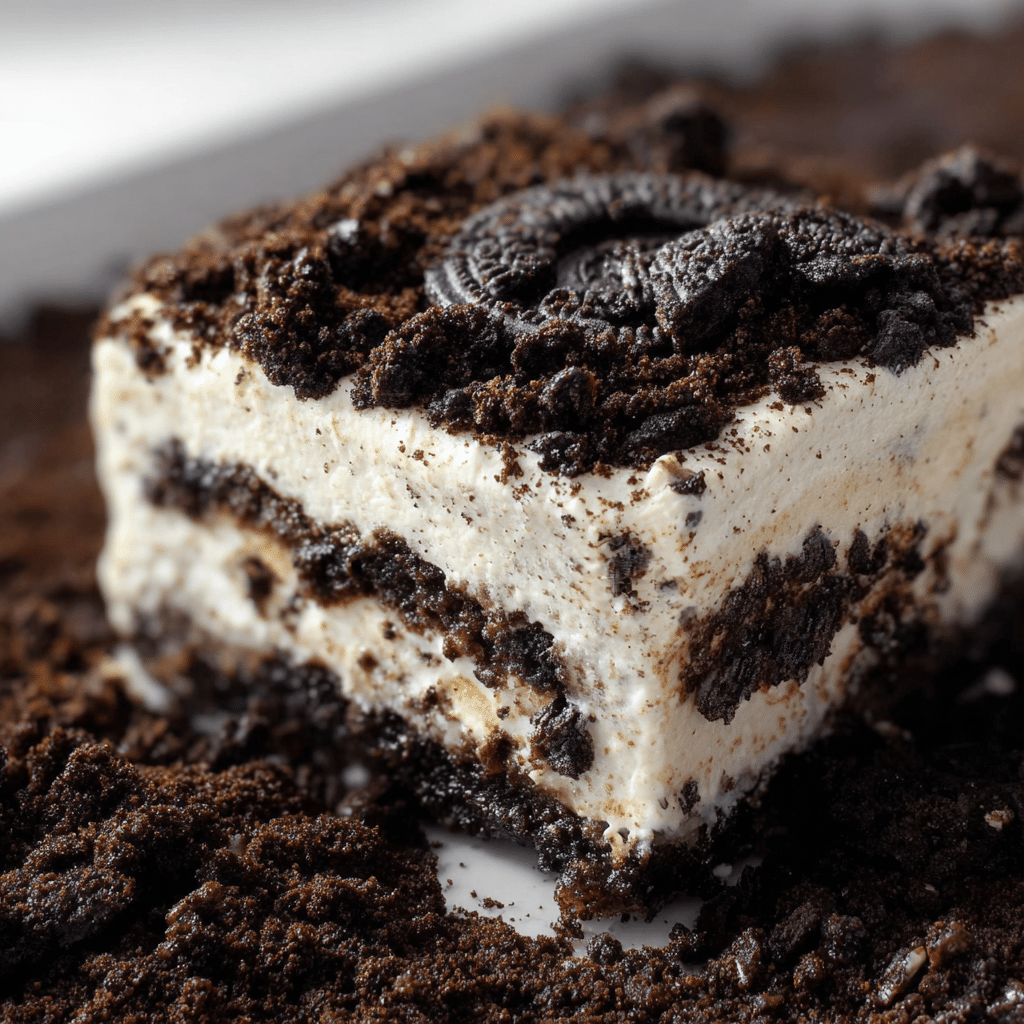
If you’re craving a dessert that blends creamy, crunchy, and dreamy textures all in one, the No-Bake Oreo Dirt Cake is exactly what you need. This easy-to-make treat combines the classic chocolatey crunch of Oreos with a smooth, luscious filling that never requires an oven. Perfect for those warm days or when you want a quick yet impressive dessert, this No-Bake Oreo Dirt Cake will wow your family and friends every time with its irresistible flavors and playful presentation.
Why You’ll Love This Recipe
- Effortless preparation: No baking required means you can whip this dessert up in minutes with minimal cleanup.
- Kid-friendly fun: It’s a playful, crowd-pleasing dessert that everyone, especially kids, will adore.
- Rich texture contrast: Creamy filling paired with crunchy Oreo bits offers a delightful bite every time.
- Versatile presentation: Serve it in cups, jars, or a big pan to impress at parties or family dinners.
- Customizable flavors: Easily tweak the recipe with different mix-ins or toppings to suit your taste.
Ingredients You’ll Need
Creating this No-Bake Oreo Dirt Cake doesn’t require a long list of ingredients; each one plays a vital role in building the perfect balance of creamy sweetness and crunchy cookies.
- Oreo Cookies: The star ingredient that adds chocolatey crunch and character to the cake.
- Cream Cheese: Adds tanginess and richness, balancing the sweetness beautifully.
- Whipped Topping: Provides that light, fluffy texture that makes the dessert dreamy and soft.
- Instant Pudding Mix: Brings creamy flavor and helps the filling set with just a simple mix.
- Milk: Needed to dissolve the pudding powder for a smooth consistency.
- Vanilla Extract: Enhances overall flavor with a subtle warmth.
Variations for No-Bake Oreo Dirt Cake
This No-Bake Oreo Dirt Cake is a fantastic foundation that invites creativity, making it easy to adjust for dietary needs or flavor preferences without sacrificing taste or texture.
- Minty Oreo Delight: Add peppermint extract to the filling and use mint-flavored Oreos for a refreshing twist.
- Peanut Butter Bliss: Mix in creamy peanut butter to the pudding for a nutty variation.
- Dairy-Free Version: Use dairy-free cream cheese and whipped topping alternatives for a vegan-friendly dessert.
- Berry Infusion: Layer in fresh strawberries or raspberries for a fruity balance to the richness.
- Chocolate Lovers’ Dream: Add chocolate chips or drizzle melted chocolate on top for extra decadence.

How to Make No-Bake Oreo Dirt Cake
Step 1: Prepare the Oreo Base
Start by crushing about two-thirds of your Oreo cookies into small pieces. This will serve as the crunchy layer at the bottom and the crumbly topping later. Set aside the remaining cookies for layering and garnish.
Step 2: Make the Creamy Filling
In a mixing bowl, blend the softened cream cheese with the instant pudding mix and vanilla extract until smooth. Slowly add the milk and whisk to create a thick yet fluffy batter. Gently fold in the whipped topping, ensuring the mixture stays light and airy.
Step 3: Assemble the Layers
In a large serving dish or individual cups, start with a generous layer of crushed Oreos, followed by a thick spread of the creamy filling. Repeat the layers, finishing with a sprinkle of Oreo crumbs on top for that classic dirt cake look.
Step 4: Chill and Set
Cover the cake with plastic wrap and refrigerate for at least 4 hours or overnight. This allows the flavors to meld, and the pudding to firm up, achieving that perfect no-bake dessert texture.
Step 5: Garnish and Serve
Right before serving, you can crumble a few more Oreo pieces or add gummy worms for a fun dirt cake vibe. Scoop out generous portions and enjoy the creamy, crunchy goodness.
Pro Tips for Making No-Bake Oreo Dirt Cake
- Use full-fat ingredients: They provide a richer, creamier taste and better texture.
- Don’t overmix the whipped topping: Fold it in gently to keep the filling light and fluffy.
- Chilling is key: Allow enough time in the fridge for the cake to set properly—patience pays off!
- Customize Oreo size: Crush larger pieces for textural contrast and finer crumbs for smoothness.
- Serve cold: This dessert shines when chilled, so keep it refrigerated until just before serving.
How to Serve No-Bake Oreo Dirt Cake
Garnishes
Enhance your No-Bake Oreo Dirt Cake with playful garnishes like crushed Oreos, mini chocolate chips, or colorful gummy worms for a fun “dirt” effect that’s sure to delight kids and adults alike.
Side Dishes
Pair this dessert with fresh fruit slices or a scoop of vanilla ice cream to balance the richness and add a refreshing element to your dessert spread.
Creative Ways to Present
For parties, try layering the No-Bake Oreo Dirt Cake in clear mason jars or small cups so guests can see all the delicious layers. Alternatively, create individual dirt cake parfaits garnished with edible flowers or chocolate shavings for an elegant twist.
Make Ahead and Storage
Storing Leftovers
Leftover No-Bake Oreo Dirt Cake should be covered tightly with plastic wrap or stored in an airtight container and kept refrigerated, maintaining freshness for up to 3 days.
Freezing
You can freeze portions of this dessert by placing them in freezer-safe containers for up to one month; thaw in the fridge overnight before serving to preserve texture and flavor.
Reheating
This dessert is best served cold and isn’t meant to be reheated. Simply thaw frozen portions in the refrigerator to enjoy the perfect creamy consistency.
FAQs
Can I use other cookies instead of Oreos?
Absolutely! While Oreos are classic, you can substitute with other chocolate sandwich cookies or even gluten-free options to suit your preference.
Is No-Bake Oreo Dirt Cake suitable for kids?
Yes! It’s a favorite among kids due to its fun texture and sweet flavor, plus the no-bake method makes it easy and safe for them to help prepare.
Can I make this recipe dairy-free?
Yes, by choosing dairy-free cream cheese, whipped topping, and milk alternatives, you can make a delicious dairy-free No-Bake Oreo Dirt Cake.
How long does it take to set in the fridge?
A minimum of 4 hours is recommended for the pudding to firm up properly, but chilling overnight yields the best texture and flavor melding.
Can I double this recipe?
Definitely. Just double the ingredients and use a larger dish or multiple serving containers to accommodate the extra cake.
Final Thoughts
If you want a dessert that’s both simple to prepare and guaranteed to impress, the No-Bake Oreo Dirt Cake is your new secret weapon. Its creamy layers, crunchy cookie bits, and fun presentation come together to create a crowd-pleasing treat that’s perfect for any occasion. So go ahead, grab those Oreos, and start layering your way to deliciousness today!
Related Posts
- Why Orange Ginger Honey Loaf Cakes Delight
- Why Blueberry Crumble Cheesecake Steals Hearts
- Irresistible Red Velvet Brownies with Cream Cheese Frosting
No-Bake Oreo Dirt Cake
A no-bake dessert combining creamy, fluffy filling with crunchy Oreo cookie layers, creating a fun, kid-friendly treat that requires no oven and is perfect for parties or quick family desserts.
- Prep Time: 15 minutes
- Cook Time: 0 minutes
- Total Time: 4 hours 15 minutes
- Yield: 8 servings
- Category: Dessert
- Method: No-Bake
- Cuisine: American
- Diet: Vegetarian
Ingredients
Ingredients
- Oreo Cookies (about 30-40 cookies)
- Cream Cheese (8 oz, softened)
- Whipped Topping (8 oz, thawed)
- Instant Pudding Mix (1 package, 3.4 oz, vanilla or chocolate flavor)
- Milk (2 cups)
- Vanilla Extract (1 teaspoon)
Instructions
- Prepare the Oreo Base: Crush about two-thirds of the Oreo cookies into small pieces. These crushed cookies will be used as the crunchy bottom layer and the topping. Keep the remaining cookies whole or halved for layering and garnish.
- Make the Creamy Filling: In a mixing bowl, blend the softened cream cheese with the instant pudding mix and vanilla extract until smooth. Gradually add the milk, whisking continuously to create a thick yet fluffy batter. Carefully fold in the whipped topping to keep the mixture light and airy.
- Assemble the Layers: In a large serving dish or individual cups, place a generous layer of crushed Oreos at the bottom. Spread a thick layer of the creamy filling over the crushed cookies. Repeat the layering process, ending with a sprinkle of Oreo crumbs on top for the classic dirt cake appearance.
- Chill and Set: Cover the assembled cake with plastic wrap and refrigerate for at least 4 hours or preferably overnight. This chilling time allows the flavors to meld and the pudding filling to firm up for the perfect texture.
- Garnish and Serve: Just before serving, crumble a few additional Oreo pieces or add gummy worms on top for a playful ‘dirt’ effect. Serve chilled and enjoy the delightful combination of creamy and crunchy textures.
Notes
- Use full-fat ingredients for a richer and creamier texture.
- Fold in the whipped topping gently to keep the filling light and fluffy.
- Allow adequate chilling time to ensure the pudding sets properly.
- Customize Oreo crush size for varied texture—larger pieces add crunch, fine crumbs add smoothness.
- Keep the dessert refrigerated until serving for best taste and consistency.
Nutrition
- Serving Size: 1 slice (approx. 1/8 of cake)
- Calories: 350 kcal
- Sugar: 28 g
- Sodium: 250 mg
- Fat: 20 g
- Saturated Fat: 10 g
- Unsaturated Fat: 8 g
- Trans Fat: 0 g
- Carbohydrates: 38 g
- Fiber: 1 g
- Protein: 4 g
- Cholesterol: 50 mg
Keywords: No-Bake, Oreo, Dirt Cake, Dessert, Cream Cheese, Instant Pudding, Kid-Friendly, Easy Dessert